I receive a lot of emails and facebook messages from fellow photographers asking questions about how to photograph in the mountains. So this page deals with all the tips and tricks I follow while I am shooting in the Himalaya. I hope they will be of use to all my photographer friends and trekkers!
Tip 1: Don’t keep your camera in the bag
Many photographers, in order to protect their equipment, keep it in a camera bag when they are out shooting. This is the wrong thing to do because invariably the moment will be gone by the time the camera is taken out of the bag! So keep the camera and one lens around your neck and keep the rest of the equipment in the bag to be used if needed. You will need to select the lens you want to use before starting out!
Tip 2: Simplify your equipment
I have seen a lot of photographers in the field with a full bag of lenses: wide angle, prime normal, zoom, telephoto etc. The problem of carrying such a lot of equipment is that you are invariably spoiled for choice and by the time you decide what to use the moment may have passed you once again! I recently did a seventeen day trek and photo assignment in the Everest region of Nepal. I carried a Nikon D600 body and a 24-120 Nikon VR lens. More than 90% of my photos were taken with this combination. In my backpack I had a Nikon D90 back up body with a 35 f2 lens which was never used! And around my waist in a pouch I had a 70-300 Nikon VR lens which was used for the remaining 10% of the shooting, mainly for wildlife, birds etc. Having simplified the equipment I was not needed to make any choices and could concentrate on getting the photograph!
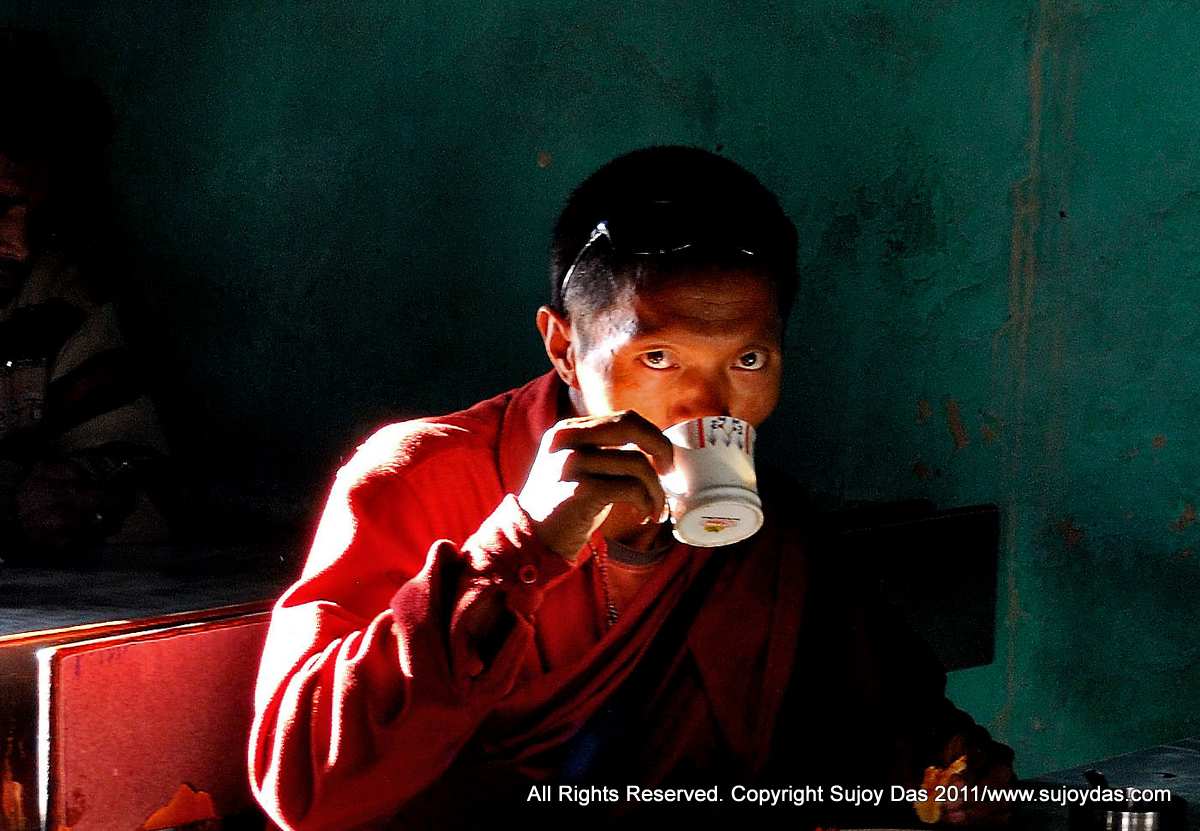
Tip 3: Shooting into the light
Mountains and people in the mountains present a lot of opportunity for back lit photography. However the biggest enemy of backlit shooting is flare. So you need to protect your lens. How?
Use a lens hood – this may not always work!
Remove the UV filter if you can as sometimes flare does come from the filter if it is not properly multi-coated.
Try to shield the lens from the direct sun by stepping into the shade if possible. And if this is not possible you can try as I do by using my left hand to keep the sun away from the lens. Make sure that your hand does not come in the photo! Better still if you have a friend with you ask him to shield your lens and then you can use both hands to take the photo!
Tip 4: F8 and be there
Basically this famous photography axiom asks you to be ready to shoot. So rather than adjust white balance, aperture, shutter speed , metering modes, focus modes etc before taking a photo, you to need to set all this before hand. On a normal day in the Himalaya, I will usually set the following before I start out: WB auto, ISO auto set to maximum of 800, aperture priority around 6.3 or so, matrix metering, AF-S for single focus. This allows me to shoot in most situations provide the light is reasonable. And, if I have time I would bracket three to four exposure either by using auto bracketing or manually -0.3, -0.7, -0.1, +0.3, + 0.7. This usually nails the photograph right in the camera.
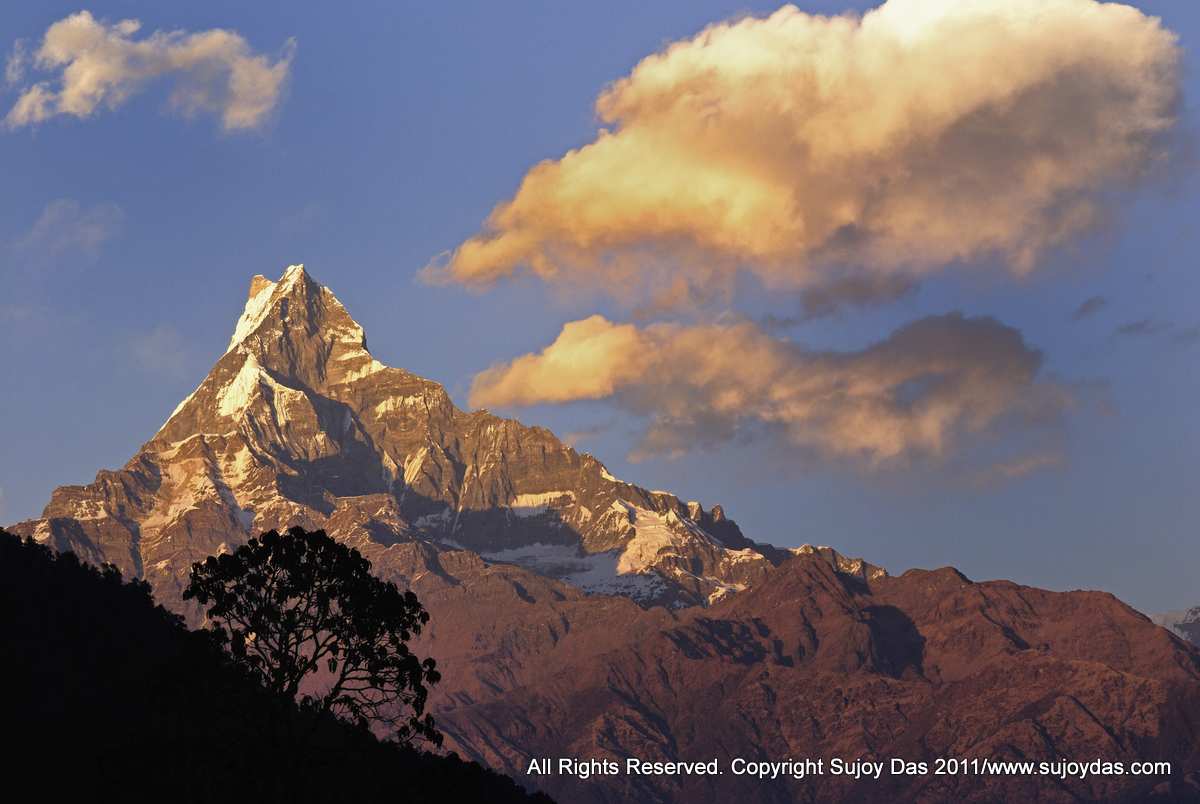
Tip 5: Use the light to your advantage
In the mountains, the early morning light and late evening light is usually very flattering and I have to confess that I am partial to the late evening light before sun down. Sometimes you need to wait for the right light. A lot of mountain landscapes are made due to the patience of the photographer. It also helps to know how the subject will look at a certain time of day. For example, certain monasteries in Ladakh get the western sun and so look best in the evening. Similarly, the Sandakphu view near Darjeeling has an amazing amount of warmth and texture when seen in the evening light.
Tip 6: Don’t put away your camera in bad weather
Mountain weather is unpredictable. There may be bright sunshine in the morning and snow and sleet in the afternoon. Sometimes great photos are taken in inclement weather. Recently a fellow photographer posted on Facebook that due to rain he did not take his camera into the Valley of Flowers and shot on his mobile instead! If you are shooting in the rain or snow try to protect your camera by covering it with a cloth or a temporary plastic cover. When I am walking and it is raining or snowing I keep my camera over my shoulder inside my jacket so that I can take it out and shoot as needed. When you get back to camp, remove the plastic, wipe the camera and lens clean with a dry cloth and leave in the open in your room or tent for it to breathe and the moisture to dry out.
Tip 8: Batteries
Batteries are a major problem in the Himalaya. Ideally you need to carry two batteries with you as often on long treks you do not have access to electricity to charge batteries. At night it often helps to take the batteries out of the camera and put it into a warm jacket or sleeping bag. And on the subject of batteries and extending battery life, stop looking at the LCD after every shot! In the Himalaya to save batteries my LCD is disabled and comes on only when I press the button. Also avoid scrolling through all the photos at camp every night as this drains the battery as well!
Tip 9: If you can, take along a small table top light weight tripod
Ideally most photographers would recommend a full heavy weight tripod but I have given this up in the Himalaya a long time ago! It is too heavy to carry and also in some situations difficult to set up. So I have a small Slik table top which can also fit into a jacket pocket which I use when I need support. The Joby Gorilla pod is also an option and has the advantage of flexible legs!
Tip 10: Don’t get mesmerized by the mountain ranges – look for detail near you as well
Often in a mountain environment, we tend to get mesmerized by the sheer beauty of the mountain ranges and shoot them as much as we can: at sunrise, at sunset, during the day. However, very often there is a lot of interesting details in the rocks, flowers, plants etc in the terrain through which we walk. Very often it is possible to combine this in a wide angle view to create a spectacular shot which is out of the ordinary. So don’t put the mountain in the top of the frame every time and shoot. Look at what is near your feet as well!
Tip 11: When your camera is on a tripod switch VR off
This is something that in the spur of the moment many of us forget. When we put a camera on a tripod the tripod is supposed to keep the camera rock-steady and thus we don’t need VR as well to compensate for camera shake. Those who are using Canon will have IS to be switched off.
Tip 12: When shooting mountain landscapes reduce the aperture for maximum depth of field
We need to be at F11 or even F16 to get maximum depth of field when shooting a landscape, especially if we want sharpness from say three feet to infinity. The only way to achieve this is to stop down the lens and adjust the shutter speed. If the ISO is low say around 200, then in low light the speed may even be 1/15 or 1/8 of a second. A tripod is often called for unless you have very steady hands!
Tip 13: Shooting at night
The half light between dusk and darkness offers some interesting possibilities in the mountains. There is still some light in the sky but there is also some foreground lights which are interesting like the lights of a village. Often if you are close enough and it is a clear evening you can see mountains as well. I try to avoid cranking up the ISO to more than 800 and then setting up the camera on a tripod or support take a series of four or five photographs bracketed around a central exposure. Invariably one of them works the best. It is advised to keep long exposure noise reduction (NR) on for these types of shots. An example of this type of a shot is here http://www.sujoydas.com/Nepal-Himalaya/Kala-Pattar-and-Everest-Spring/17107726_DJR2DG#1296374610_QDCKK5q-L-LB
Tip 14: Panning motion
Sometimes in the mountains we also need to shoot an event e.g. the masked dances at Hemis monastery in Ladakh. Along with the regular shots of the dancers pirouetting around the monastery courtyard, it is interesting to cut back on the shutter speed, say 1/8 or 1/15th of a second and then pan the camera along with the movement of the dancers to capture motion. An example of this sort of a photograph is here http://www.sujoydas.com/Sikkim-Himalaya/Sikkim-Monasteries/8023342_E6Hrs#771051897_53Emn-L-LB
Tip 15: The Polarizing Filter
This filter can often help in bright mountain landscapes to saturate skies and increase contrast to give “more punch” to a photograph. It usually adds two stops to the exposure so a PL filter will require an aperture of say F4 if a non PL needed F8, speed being the same. You can rotate the PL filter once it is mounted on the lens to adjust the level of saturation that you want.
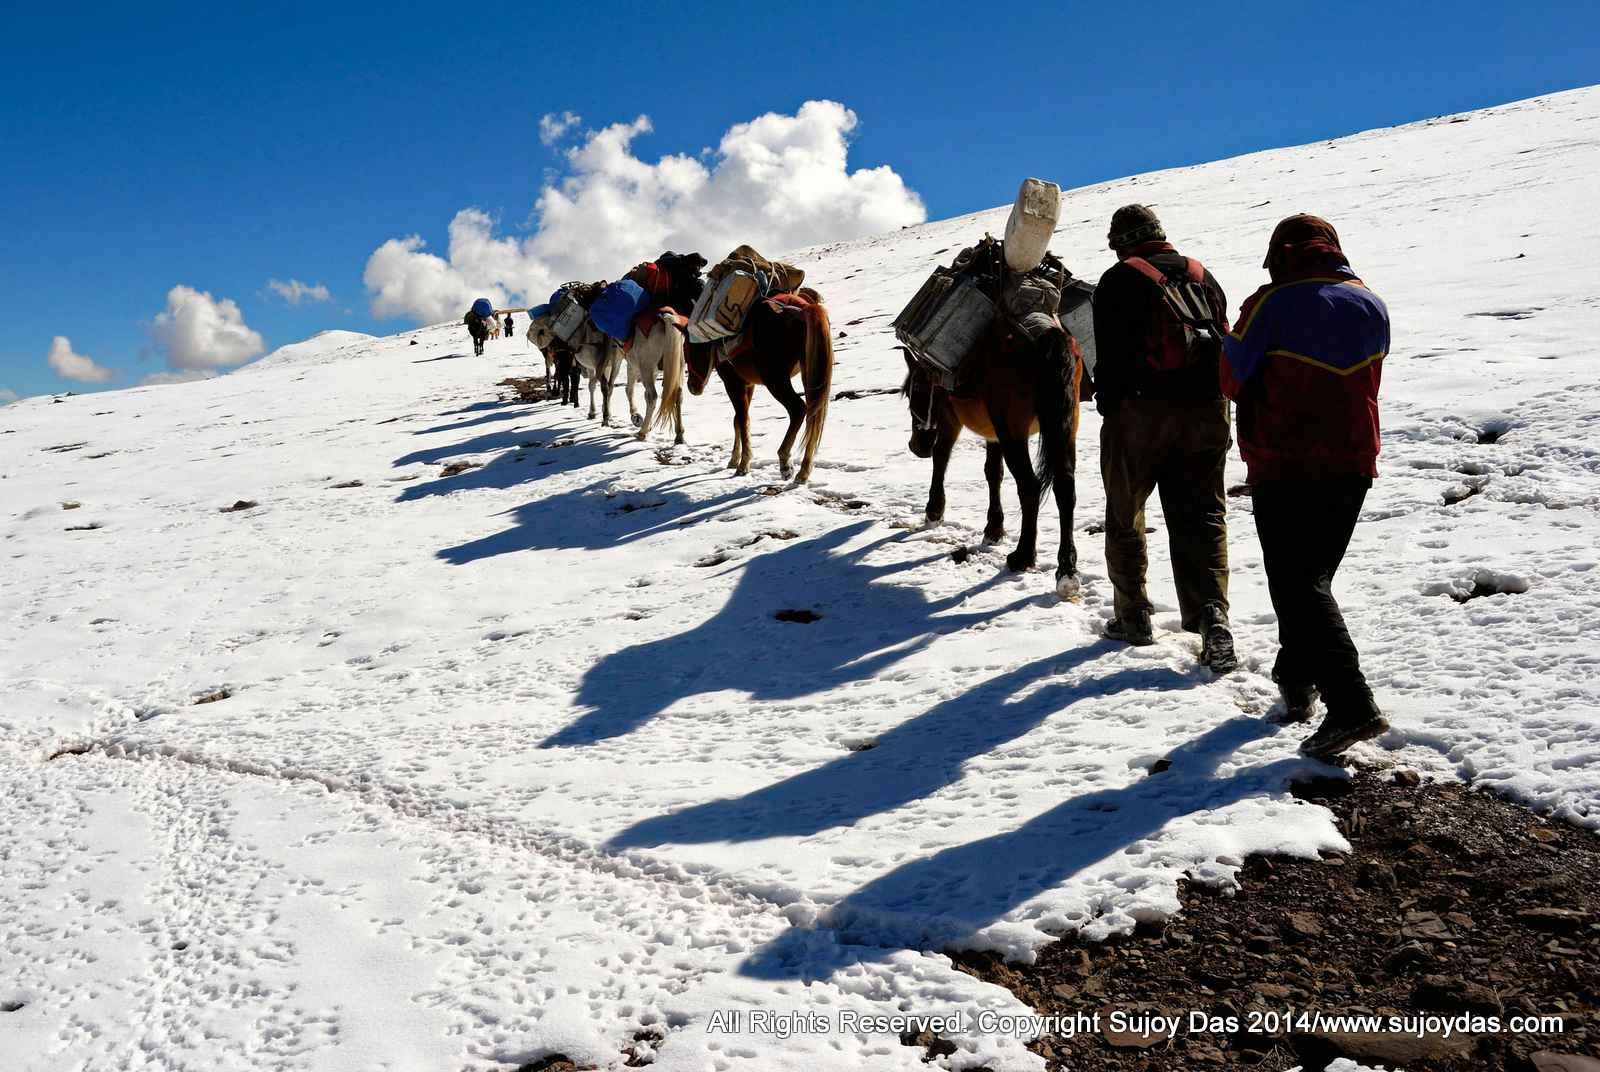
Tip 16: A splash of color in a monochrome landscape
Very often when it snows in the mountains or when a storm is brewing, the landscape is almost monochrome, white snow, grey black clouds, gushing streams etc. In this scenario a very effective technique is to add a splash of color to bring the landscape to life e.g. a red umbrella, or a trekker with a bright jacket walking through the rain or snow. The contrast often creates a photograph which is out of the ordinary.
Tip 17: Use the lowest ISO possible
A mistake which some of us often make is to set a higher ISO than what is needed for the light conditions. Rule of thumb would be:
Daylight with bright sunlight: ISO 100-200
Early mornings and evenings: ISO 400-640
Interiors where flash cannot be used: ISO 800-1600-3200
Sports motion/wildlife: ISO 400-1600
Tip 18: Try to avoid shooting at the middle of the day
When the sun is high in the sky, the shadows are harsh and the light is also extremely flat and contrast. Unless there is no option, try to avoid mid day shooting and focus on the golden hours, a couple of hours before sunset and after sunrise.
Tip 19: Use both raw plus JPEG basic
There is always a debate regarding shooting only raw or to shoot JPEG but with most DSLRs you can shoot both. Memory cards are now big and cheap and so shooting Raw+Jpeg Basic would be the way to go. The raw files would remain for the more serious work and the Jpegs can be immediately sent out by e mail or used in blogs/web sites/facebook etc.
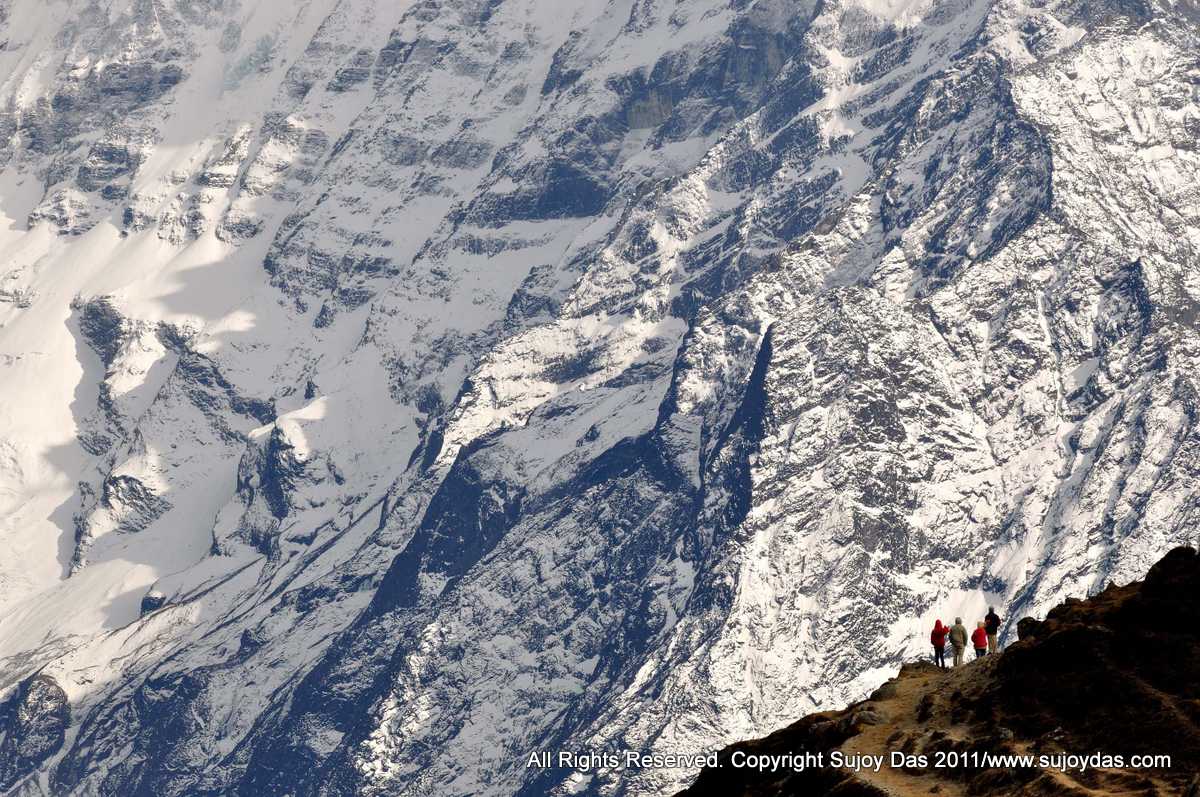
Tip 20: Sometimes a tele lens is better suited to landscapes than a wide angle!
When shooting mountain landscapes, we invariably reach for a wide angle lens as we want to get it all in. However, sometimes a telephoto lens is better suited for mountain landscapes. The dramatic perspective of say a 200 mm lens changes the whole scene and creates an image which is a lot different than what a wide angle or normal lens would deliver. The photograph below is taken on a trek to Gokyo in Nepal using a 70-300 zoom illustrates this:
Tip 21: Shoot the same image both horizontally and vertically
When shooting a mountain landscape, take both horizontal and vertical shots. You never know what would be required. For example, a magazine cover would need a vertical shot whereas a two page layout could use a horizontal frame. It helps to cover all possibilities in the camera so that while editing the most suitable frame can be used.
Tip 22: A beautiful view does not always translate into a great photograph
Sometimes when walking in the mountains we see a view which is just awesome! The valleys are green, the mountain tops glistening with white fresh snow, an azure blue sky, you know what I mean! So we raise our cameras and shoot – plenty of shots- one after the other! However, when you are back in front of the computer, the view doesn’t look all that great any more! Why? The reason usually is that a view requires a point of interest and if you don’t have this, the photograph is not likely to be as awe inspiring as it was in real life. The camera and the eye don’t see the same thing, so look for a point of interest, change the angle, maybe zoom in with a longer lens or go down on the ground with a wide angle! There are so many possibilities which can work for you and create that awe inspiring image!
Tip 23: Expose correctly for the snow
Mountain landscapes sometimes have vast areas of snow and that dazzling white expanse is difficult expose correctly. The tendency of the meter would be to underexpose resulting in the snow looking grey and flat and not sparkling white. You need to meter from some area other than the snow, perhaps your hand or even the blue sky and adjust the exposure accordingly. Finally always bracket exposures so that you have a number of images to choose from! An example of this sort of photograph metered off the sky is above.
South Col Expeditions runs a number of treks and photo workshops in the Himalaya every year. For up to date details please do visit https://www.southcol.com/treks-nepal/